 100% Australian owned and operated

The short answer
Add your domain in the Microsoft 365 admin center, choose Add your own DNS records, and copy the records Microsoft shows onto your domain’s DNS page in the Chill dashboard: a TXT record to prove you own the domain, an MX record and an autodiscover CNAME so mail reaches Outlook, an SPF record, two DKIM CNAMEs and a DMARC record so other mail services trust what you send.
- Don’t pick Set up my online services for me. It moves your domain’s DNS to Microsoft, and your website records would have to move too.
- Your website isn’t affected by the email records. Email follows the MX record; the website follows the A record.
- Microsoft’s values include your domain name, so copy them from your own admin center, not from this page.
- Rather we did it? Reply to any of our emails with what Microsoft gave you and we’ll add the records, no charge.
The records at a glance
Here’s what you’ll add, in order. In these examples the domain is yourname.com.au; Microsoft writes it with dashes in some values, like yourname-com-au.
| Record | Type | Host | Value |
|---|---|---|---|
| Verification | TXT | @ | MS=ms… from Microsoft |
| Mail delivery | MX | @ | yourname-com-au.mail.protection.outlook.com, Prio 0 |
| Autodiscover | CNAME | autodiscover | autodiscover.outlook.com |
| SPF | TXT | @ | v=spf1 include:spf.protection.outlook.com -all |
| DKIM (two) | CNAME | selector1._domainkey, selector2._domainkey | selector1-yourname-com-au._domainkey.… from Microsoft |
| DMARC | TXT | _dmarc | v=DMARC1; p=none; rua=mailto:dmarc@yourname.com.au |
Verification proves you own the domain. MX delivers your mail to Microsoft, and autodiscover lets Outlook set itself up. SPF says Microsoft may send for you, DKIM signs your mail, and DMARC is your policy for fakes. Leave the TTL at the dashboard’s default of 3600 seconds. Email and your domain explains what each kind of record does.
Before you start: three quick checks
Is the domain on Chill DNS?
Open the domain in your dashboard. If you see an Edit DNS records button, every record in this guide goes there. If you see Switch to Chill DNS to edit records, click it: a new domain on the Holding page just needs Save nameservers, then confirm. If the Nameservers page lists someone else’s nameservers, the records go there instead.
Do you have a plan with email?
You need a Microsoft 365 business plan that includes Exchange email, such as Microsoft 365 Business Standard. Microsoft notes that Microsoft 365 Apps for business doesn’t include email.
Does the domain already have email?
If you use Chill email forwarding, you’ll swap it for Microsoft in step 3. If mail goes to another provider, Microsoft says to set up your users’ mailboxes first, so nothing is missed when the MX record changes.
Step 1: Add your domain and prove you own it
In the Microsoft 365 admin center, go to Settings › Domains and click Add domain. Type your domain, click Use this domain, then choose Add a TXT record to the domain’s DNS records and Continue.
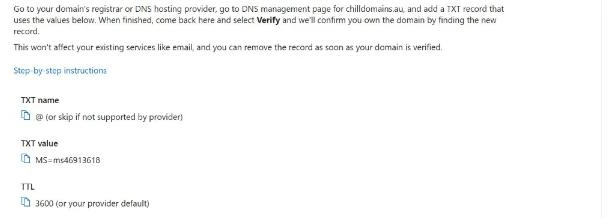
On the Chill DNS page, under Add a record, pick Type TXT, put @ in Host and paste the MS=ms… value into Value. Click Add record, then Verify back in Microsoft.
In our test, the first Verify failed, probably because our nameservers hadn’t picked up the new record yet. A minute later, Try again worked. If it fails for you, wait a few minutes and try again before changing anything.
Step 2: Choose “Add your own DNS records”
Microsoft then asks how you want to connect the domain. You may need to click More options to see all three choices.
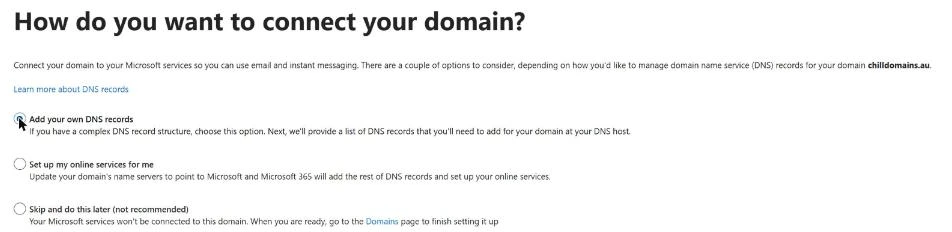
Don’t choose “Set up my online services for me”. It has you point your domain’s nameservers at Microsoft, so your DNS would be run there instead of on your Chill DNS page. Your website records would stop working unless you recreated them at Microsoft.
Step 3: Point your mail at Microsoft (MX, autodiscover, SPF)
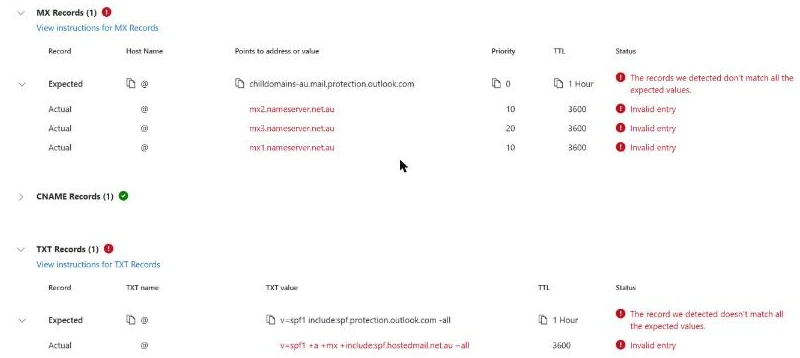
Leave Exchange and Exchange Online Protection ticked and expand the three record groups. Microsoft shows exactly what it expects:
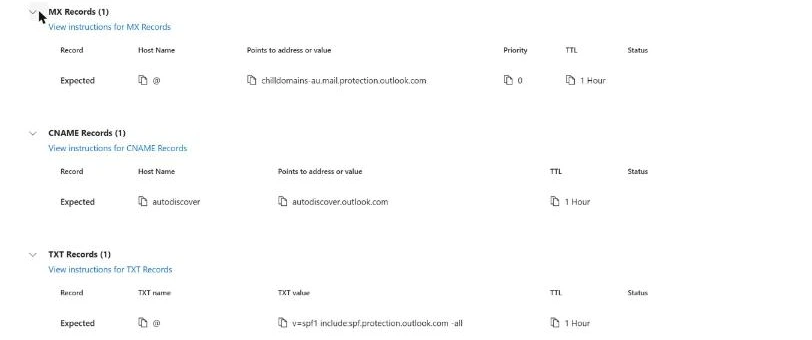
Add each one on the Chill DNS page:
- MX: Type
MX, Host@, Value the…mail.protection.outlook.comaddress, Prio0. - Autodiscover: Type
CNAME, Hostautodiscover, Valueautodiscover.outlook.com. - SPF: Type
TXT, Host@, Valuev=spf1 include:spf.protection.outlook.com -all. A domain can have only one SPF record. If there’s already one, edit it instead: Microsoft says to add itsinclude:to the existing record rather than create a second.
Then delete every other MX record, so all new mail goes to Microsoft.
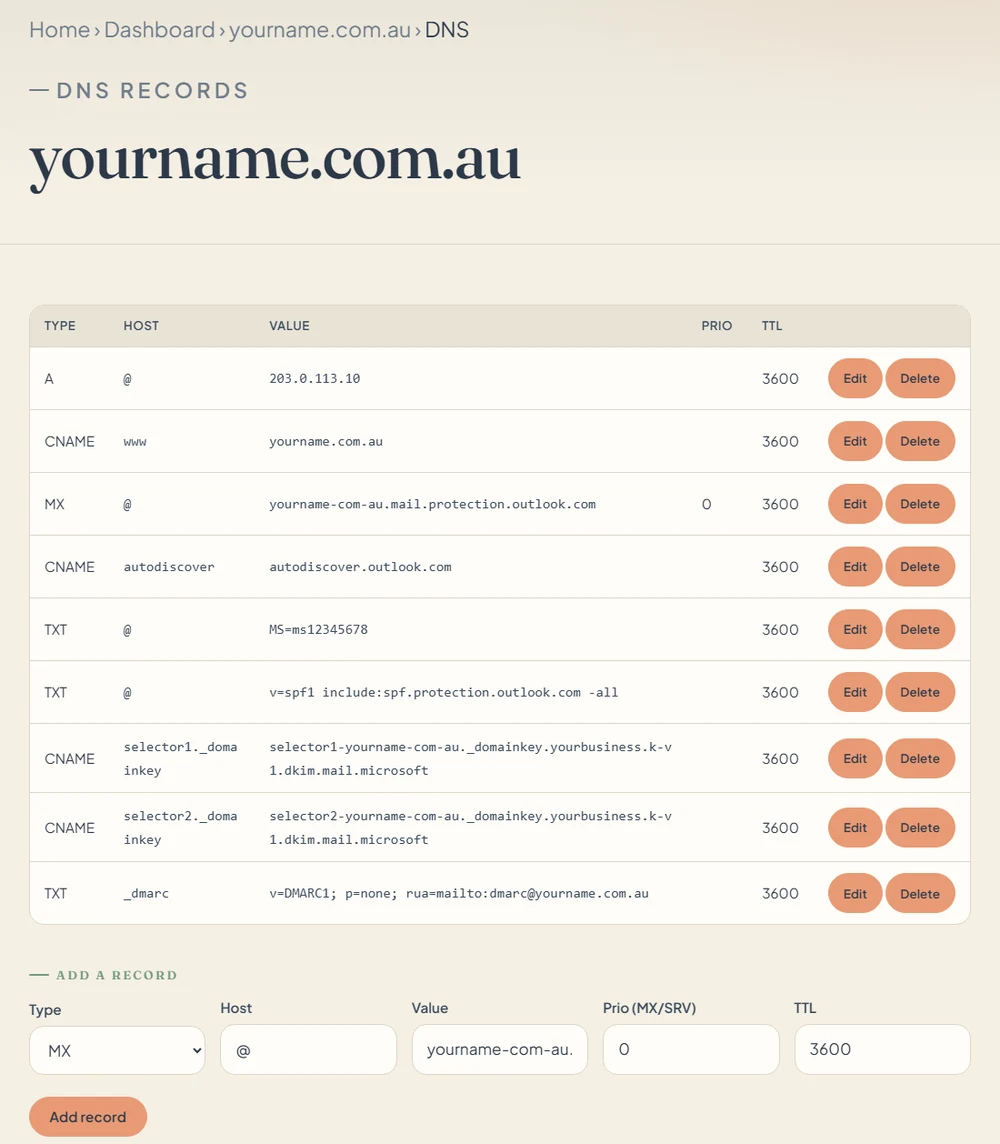
Switching from Chill email forwarding? Add Microsoft’s MX record first. Then delete the three forwarding MX records (mx1.nameserver.net.au, mx2.nameserver.net.au and mx3.nameserver.net.au) on the DNS page, and your forwards on the domain’s Email forwarding page. Forwarding usually added an SPF record mentioning spf.hostedmail.net.au; edit that one into Microsoft’s value.
Back in Microsoft, click Continue. It checks your nameservers and, when everything matches, says Domain setup is complete.
Step 4: Give the address a mailbox
Mail for your domain now arrives at Microsoft, but each address needs somewhere to land:
- A user, under Users › Active users, for a person. Each user needs a licence.
- A shared mailbox, under Teams & groups › Shared mailboxes, for an address several people answer, like hello@ or accounts@. Microsoft says a shared mailbox holds up to 50 GB without a licence of its own; the people you add as members need their own licensed mailboxes.
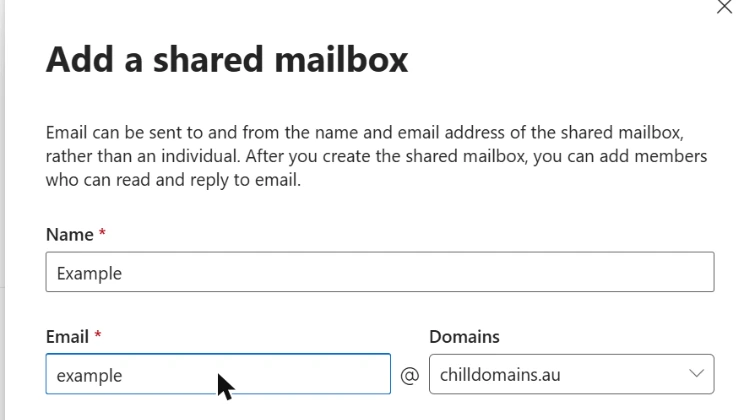
Add yourself as a member. The Outlook app usually adds the shared mailbox beside your own; in Outlook on the web, right-click your own account name in the folder list and choose Add shared folder or mailbox. Microsoft says details of a new shared mailbox or member can take about an hour to reach all its data centres. In our test, Outlook refused to open the new mailbox for at least ten minutes. When we came back about two hours later, it opened with our test email waiting, so give it at least an hour before troubleshooting.

Step 5: Sign your mail (DKIM)
Microsoft signs mail from its own onmicrosoft.com address automatically, but not from your domain until you switch it on. You switch DKIM on in the Microsoft Defender portal, not the admin center.
Create the keys
Go to security.microsoft.com › Email authentication settings › DKIM, click your domain, then Create DKIM keys.
Add two CNAME records
Microsoft shows two: Host
selector1._domainkeyandselector2._domainkey, each pointing to a long address ending indkim.mail.microsoft. Add both on the Chill DNS page as TypeCNAME.Switch it on
Back in the panel, turn on Sign messages for this domain with DKIM signatures.
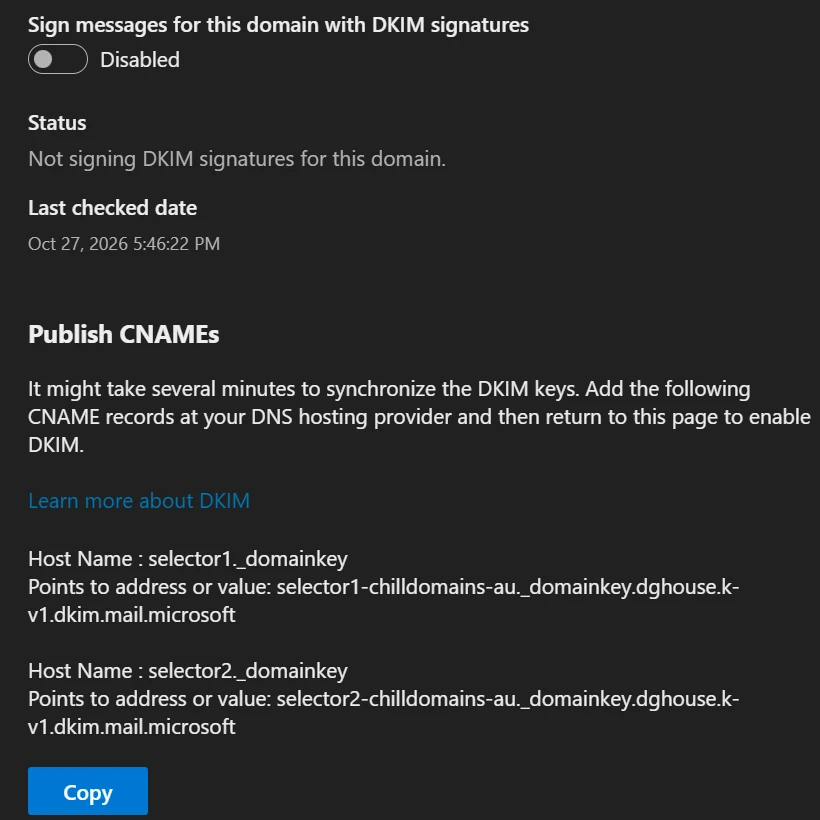
If the switch says the CNAME records don’t exist, Microsoft hasn’t seen them yet. Its message says syncing can take “a few minutes to as many as 4 days”. In our test, the records were visible to the public within minutes, but the switch kept refusing for at least a quarter of an hour. When we tried again about two hours later, it switched on and the status changed to Valid. Check the two records are right, then try again later.
Step 6: Set your policy (DMARC)
DMARC works the same whichever provider you use. Start with a policy of none, which only reports:
Type: TXT Host: _dmarc Value: v=DMARC1; p=none; rua=mailto:dmarc@yourname.com.au
Send the reports to an address set aside for them, such as a shared mailbox called dmarc@, not your own inbox. They’re automated summaries from the big mail services. Once they show your genuine mail passing, you can tighten the policy to p=quarantine and later p=reject.
Check it works
Ask Microsoft
In the admin center, Settings › Domains, click your domain, then DNS records. Each record shows a status.
Look up the records
Type your domain into the DNS tab of our toolbox. You should see Microsoft’s MX record, exactly one SPF record, and no leftovers.
Send a test both ways
From a different account, such as a personal Gmail, email your new address, then reply from Outlook. In Gmail, open the reply, then the three-dot menu, then Show original. SPF, DKIM and DMARC should each say PASS. Our test reply from example@chilldomains.au passed all three.
If something doesn’t work
| What you see | Most likely cause | Fix |
|---|---|---|
| Verify fails | Microsoft hasn’t seen the TXT record yet, or it’s somewhere that isn’t live | Check the domain shows Edit DNS records and the record is Type TXT. Wait a few minutes and click Try again. |
| “Refresh the page or try again later” | A temporary Microsoft error | Wait a minute and click Continue again. |
| “Invalid entry” next to old records | Old MX or SPF records still there, or not yet replaced on the nameservers | Delete the old MX records, edit the old SPF, wait a few minutes, then Continue again. |
| “A domain can only have one SPF record” | The domain already has an SPF record | Edit the existing record instead of adding another (step 3). |
| DKIM switch says the CNAME records don’t exist | Microsoft hasn’t synced them yet | Check both CNAMEs character for character, then try again later. Microsoft allows up to four days. |
| The shared mailbox won’t open in Outlook | The membership hasn’t reached Outlook yet | Give it about an hour, then reload Outlook. |
| The website stopped working | The nameservers were moved to Microsoft, or a website record was deleted | Check the Nameservers page still shows Chill DNS and the A and www records are still there. |
Stuck? Reply to any email from us with a screenshot of what Microsoft is asking for, and we’ll add or fix the records for you, free.
Common questions
Do I need to move my domain to Microsoft?
Why can’t Microsoft add the records for me automatically?
Why does Microsoft’s SPF end in -all when Google’s ends in ~all?
Is a shared mailbox free?
Can I keep Chill email forwarding as well?
Can you add the records for me?
Sources
All read on 27 October 2026, alongside our own test on chilldomains.au.
- Connect your domain by adding DNS records (Microsoft): the MX, autodiscover and SPF records, priority 0, removing old MX records, one combined SPF record, and Domain Connect.
- About shared mailboxes (Microsoft): 50 GB without a licence, members need licensed mailboxes, no direct sign-in, about an hour for new mailboxes and members to replicate, and Microsoft 365 Apps for business not including email.
- How to use DKIM for email in your custom domain (Microsoft): automatic signing for onmicrosoft.com, the Email authentication settings page, and the two
dkim.mail.microsoftCNAME records.
Keep reading
- Email hosting: Google Workspace and Microsoft 365 side by side, with prices inc GST.
- How to set up Google Workspace email: the same job with Google.
- Email and your domain: how MX records deliver mail, and what SPF, DKIM and DMARC each check.
- DNS records explained: every record type on the DNS page.
- Nameservers and DNS zones: why records only work where your nameservers point.