 100% Australian owned and operated

The short answer
Sign up for Google Workspace with the domain you already have, then add the records Google gives you on your domain’s DNS page in the Chill dashboard: a TXT record to prove you own the domain, an MX record so mail is delivered to Gmail, and three TXT records (SPF, DKIM and DMARC) so other mail services trust what you send.
- Your website isn’t affected. Email follows the MX record; the website follows the A record.
- If you use Chill email forwarding on the domain, Google replaces it. Remove the forwards and their MX records when you switch.
- DKIM has to wait 24 to 72 hours after Gmail is turned on, and DMARC comes after that. Google won’t create the DKIM key any sooner.
- Rather we did it? Reply to any of our emails with what Google gave you and we’ll add the records, no charge.
The five records at a glance
Here’s everything you’ll add, in the order you’ll add it. The values marked from Google are unique to your account, so copy them from your Google Admin console, not from this page.
| Record | Type | Host | Value |
|---|---|---|---|
| Verification | TXT | @ | google-site-verification=… from Google |
| Mail delivery | MX | @ | smtp.google.com, Prio 1 |
| SPF | TXT | @ | v=spf1 include:_spf.google.com ~all |
| DKIM | TXT | google._domainkey | v=DKIM1; k=rsa; p=… from Google |
| DMARC | TXT | _dmarc | v=DMARC1; p=none; rua=mailto:dmarc@yourname.com.au |
Verification proves you own the domain, MX delivers your mail to Gmail, SPF says Google may send for you, DKIM is Google’s signature key and DMARC is your policy for fakes. Leave the TTL at the dashboard’s default of 3600 seconds (one hour). If you’d like the background first, Email and your domain explains what MX, SPF, DKIM and DMARC each do.
Before you start: three quick checks
Is the domain on Chill DNS?
Open the domain in your dashboard. If you see an Edit DNS records button, you’re set: every record in this guide goes there. If you see Switch to Chill DNS to edit records instead, click it and look at what the Nameservers page shows.
New domain on the holding page?
If the Nameservers page says Holding page, Chill DNS hosting is already selected for you. Click Save nameservers and confirm, and Edit DNS records appears. Nothing changes for visitors until you add records. If it lists other nameservers, such as your web host’s or Cloudflare’s, your DNS is run there and the records go there instead. Adding them in Chill won’t do anything while another provider’s nameservers are live.
Does the domain already have email?
If you use Chill email forwarding, you’ll swap it for Google in step 3. If mail already goes to another provider, such as your web host or Microsoft 365, move any mail you want to keep before you change the MX record, because new mail starts arriving at Google as soon as it’s live.
Step 1: Sign up for Google Workspace
Start at Google Workspace’s sign-up page. That’s our referral link: if you sign up through it, Google pays us a small one-off fee, and your price is the same. You can also go straight to workspace.google.com. New to Google Workspace? Email us and we’ll send you a code for 10% off your first year on Business Starter, Standard or Plus. It’s one code per customer, so ask before your free trial ends.
When Google asks whether your business has a domain, say yes and type the domain you have with us, such as yourname.com.au. Don’t buy a new domain through Google: you already have one.
You’ll create your first user, which becomes your new address (for example, jane@yourname.com.au), and choose a plan. Google bills Workspace per user, per month; see Google’s Australian pricing page for current prices. When sign-up is done, Google opens the Admin console at admin.google.com and walks you through setup.
Step 2: Prove you own the domain (TXT)
Google’s setup asks you to verify the domain. Choose the TXT record method if you’re offered a choice. Google shows a line that starts google-site-verification= followed by a long code. Copy the whole line.
Open the DNS page
In your Chill dashboard, open the domain and click Edit DNS records.
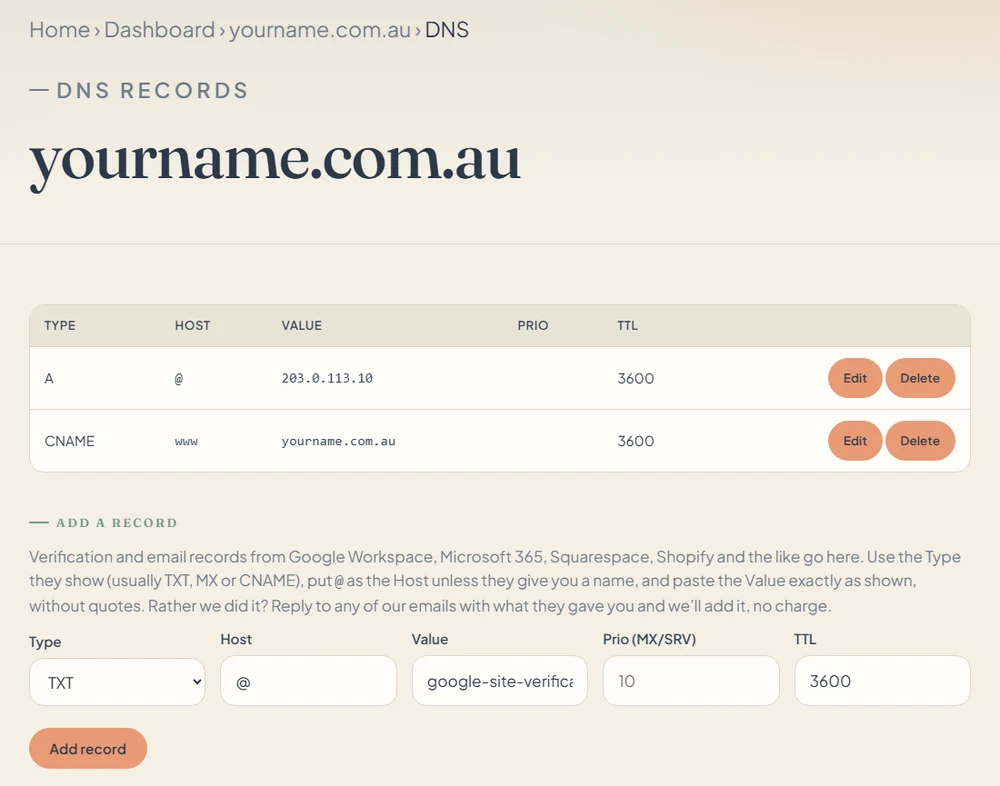
Add a TXT record
Under Add a record, set Type to
TXTfirst, then put@in Host and paste Google’s line into Value, without quotes. Leave Prio empty. Click Add record.Go back to Google and verify
Return to the Admin console and click the verify button. If Google can’t see the record yet, wait a few minutes and try again.

We publish your change to our nameservers within a few minutes. Google says it can take up to 72 hours for a new record to be recognised, but it’s usually much quicker. Google says you can remove the verification record once the domain is verified, but leaving it in place does no harm.
Form won’t submit, or says “Choose a record type first”? The Type box is still on its placeholder. Pick a Type before adding the record.
Step 3: Send your mail to Gmail (MX)
Once the domain is verified, Google’s setup moves on to Activate Gmail. If you’ve left the setup screens, it’s in the Admin console under Account › Domains › Manage domains. Google now asks for a single MX record:
Type: MX Host: @ Value: smtp.google.com Prio: 1
Add it on the DNS page the same way: Type MX, Host @, Value smtp.google.com (in lower case, as Google shows it), Prio 1. Then delete every other MX record on the domain. Google warns that old or incorrect MX records can break your email, because senders may deliver to them instead.
Switching from Chill email forwarding? Forwarding uses its own MX records: mx1.nameserver.net.au, mx2.nameserver.net.au and mx3.nameserver.net.au. Add Google’s MX record first, then delete the three forwarding MX records on the DNS page, then delete your forwards on the domain’s Email forwarding page. If any forwarding MX record stays, some of your mail goes to the forwarder instead of Gmail. Forwarding usually added an SPF record too, which you’ll replace in the next step.
Google says new MX records can take up to 72 hours to be recognised. Mail often starts arriving in Gmail within an hour or two, but it can take longer if your old provider’s records were set to be cached for longer.
Step 4: Tell the world Google sends for you (SPF)
SPF is a TXT record listing the servers allowed to send mail as your domain. For Google Workspace it’s:
v=spf1 include:_spf.google.com ~all
Add it as a TXT record with Host @. A domain must have only one SPF record, so check the DNS page first:
- No record starting
v=spf1? Add Google’s as a new TXT record. - There’s one from email forwarding (it mentions
spf.hostedmail.net.au)? Click Edit on it and replace the value with Google’s. - There’s one for another service that sends as you, such as a newsletter tool or your online shop? Edit it to include both, for example
v=spf1 include:_spf.google.com include:servers.example ~all, using the include that service gives you.
The dashboard refuses a second SPF record on the same host, so if you see “A domain can only have one SPF record”, edit the existing one instead. The ending ~all is Google’s recommended setting; it asks receivers to treat mail from anywhere else with suspicion rather than reject it outright.
Step 5: Sign your mail (DKIM)
DKIM adds a signature to every message you send, and the matching key goes in your DNS. Google creates the key, but only once Gmail has been running for a while: it says to wait 24 to 72 hours after turning Gmail on, or you may get an error that the record couldn’t be created.
Generate the key
In the Admin console, go to Apps › Google Workspace › Gmail › Authenticate email (you need to be a super administrator). Pick your domain and click Generate new record, choose 2048 as the key length, then click Generate. The Chill dashboard takes the full-length value. Leave the prefix selector as
google.Copy the two values
Google shows a DNS Host name,
google._domainkey, and a TXT record value startingv=DKIM1; k=rsa; p=followed by a long key.Add it as a TXT record
On the DNS page: Type
TXT, Hostgoogle._domainkey(just that; the dashboard adds your domain), and paste the whole value as one line. If you copied it from an email, check no line break or space crept into the key.Start authentication
Back on Authenticate email, click Start authentication. When it’s working, the status reads Authenticating email with DKIM.
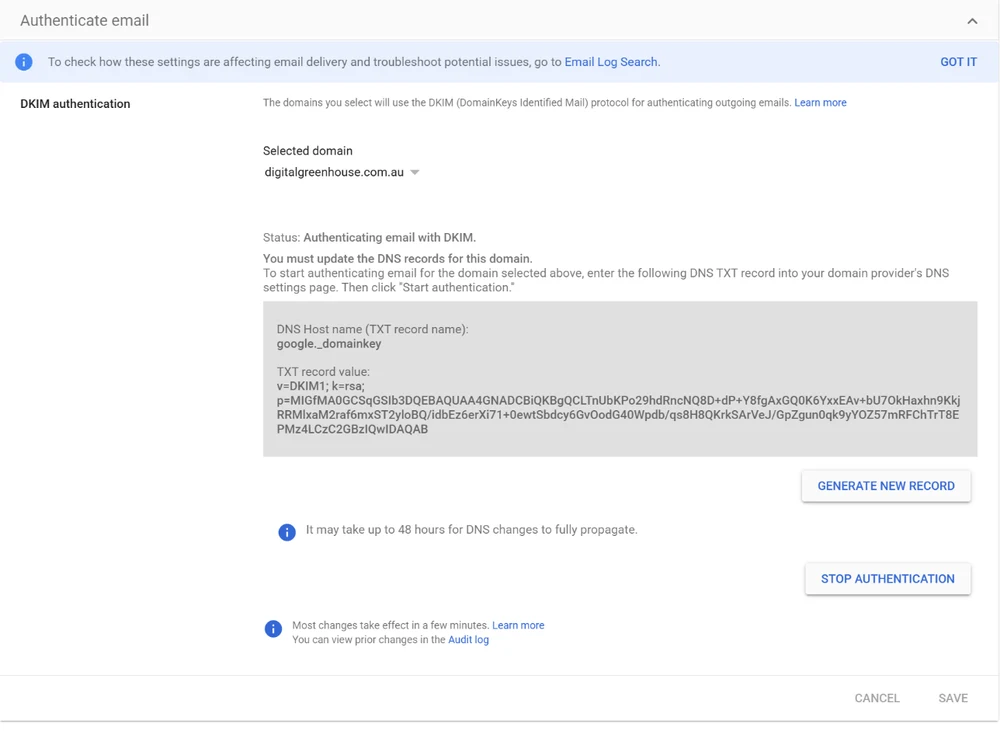
Google says DKIM can take up to 48 hours to start working after you add the record, and the Admin console may say “You must update the DNS records” for that long. If the record is right, you can ignore it and try Start authentication again later.
Step 6: Set your policy (DMARC)
DMARC tells other mail services what to do with a message that claims to be from your domain but fails SPF and DKIM. Google suggests waiting 48 hours after SPF and DKIM before adding it, and starting with a policy of none, which only reports:
Type: TXT Host: _dmarc Value: v=DMARC1; p=none; rua=mailto:dmarc@yourname.com.au
The rua address receives daily summary reports from the big mail services. They’re automated files, not something you need to read every day. Google recommends a group or a mailbox just for these reports, not your own address. A free group called dmarc@, made under Directory › Groups, keeps them out of your inbox. Set the group to accept mail from outside your organisation, because the reports come from other mail services.
After a few weeks of reports showing your genuine mail passing, you can tighten the policy to p=quarantine (failures go to spam) and later p=reject. Google also suggests raising a pct value gradually when you do, so only part of the failing mail is affected at first.
What the finished records look like
For a domain called yourname.com.au, the email part of the DNS page ends up like this (your verification and DKIM values will differ, and any website records stay alongside):
Type  Host               Value                                          Prio
TXT   @                  google-site-verification=AbCdEf...
MX    @                  smtp.google.com                                1
TXT   @                  v=spf1 include:_spf.google.com ~all
TXT   google._domainkey  v=DKIM1; k=rsa; p=MIIBIjANBgkqhkiG9w0BAQEF...
TXT   _dmarc             v=DMARC1; p=none; rua=mailto:dmarc@yourname.com.au
Two TXT records on @ is fine: one is the verification, the other is SPF. It’s two SPF records that cause trouble.
Check it works
Look up the records
Type your domain into the DNS tab of our toolbox. You should see the Google MX record and your TXT records, and no leftover MX records from before.
Ask Google
In the Admin console, Account › Domains › Manage domains has an Email setup status for each domain. Click it to see your MX, SPF and DKIM records next to the values Google recommends.
Send a test both ways
From a different account, such as a personal Gmail, email your new address, then reply. Google notes that a test sent to yourself won’t show whether DKIM works.
Read the verdict
In the personal Gmail, open your reply, then the three-dot menu, then Show original. The summary at the top should say PASS for SPF, DKIM and DMARC.
If something doesn’t work
| What you see | Most likely cause | Fix |
|---|---|---|
| Google can’t verify the domain | The record is somewhere that isn’t live, or it hasn’t been picked up yet | Check the domain shows Edit DNS records (before you start), that the Type is TXT and the value has no quotes or missing characters. Then wait and try again. |
| Some mail arrives in Gmail, some doesn’t | An old MX record is still there | Delete every MX record except smtp.google.com, including the three forwarding ones. |
| “A domain can only have one SPF record” | The domain already has an SPF record | Edit the existing record instead of adding a new one (step 4). |
| “You must update the DNS records” on the DKIM page | Google hasn’t seen the new key yet, or the key was pasted with a break in it | Compare the value on the DNS page with Google’s, character for character. If they match, wait up to 48 hours. |
| Your mail lands in people’s spam | SPF, DKIM or DMARC is missing or failing | Run the Show original test and fix whichever check doesn’t say PASS. |
| The website stopped working | A website record was changed or deleted along the way | Email setup never touches the A or CNAME records, so put them back. DNS records explained shows what they look like. |
Stuck? Reply to any email from us with a screenshot of what Google is asking for, and we’ll add or fix the records for you, free.
Common questions
Do I need to move my domain to Google?
Will setting up Google Workspace affect my website?
Can I keep Chill email forwarding as well?
Why does Google want a single MX record when older guides list five?
aspmx. Google says those still work, but new setups use the single smtp.google.com record with priority 1.How long does it all take?
Can you add the records for me?
Sources
All read on 27 October 2026.
- Google Workspace Admin Help: Verify your domain with a TXT record (Google): the TXT method, up to 72 hours to be recognised, and that the record can be removed once verified.
- Google Workspace Admin Help: Set up MX records for Google Workspace (Google): the single
smtp.google.comrecord with priority 1, removing other MX records, legacyaspmxrecords, and Activate Gmail. - Google Workspace Admin Help: Set up SPF (Google): the SPF value for Workspace.
- Google Workspace Admin Help: Set up DKIM (Google): the Authenticate email steps, 2048-bit keys, the
googleselector, the 24–72 hour wait after Gmail is turned on and the 48 hours for DKIM to start. - Google Workspace Admin Help: Set up DMARC (Google): the 48-hour wait, starting at
p=none, a group or dedicated mailbox for reports, and raisingpctgradually.
Keep reading
- Email hosting: Google Workspace and Microsoft 365 side by side, with prices inc GST.
- How to set up Microsoft 365 email: the same job with Microsoft.
- Email and your domain: how MX records deliver mail, and what SPF, DKIM and DMARC each check.
- DNS records explained: every record type on the DNS page.
- Nameservers and DNS zones: why records only work where your nameservers point.
- How DNS works: why changes can take a while to show everywhere.